 |
MATERIAL INDICES
By Olivier Saraja |
 |
MATERIAL INDICES
By Olivier Saraja |
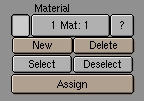
Call the Edit Buttons (F9-KEY). You will see the following set of buttons, that enables you to work with material indices. We will make a brief tour of these before putting them at use, in the next step.

First of all, please pay a look to the material name currently active : 'Material' in this example. You already understand the interest in giving to materials self-explanatory names, because if you don't, you'll have trouble to find your way through them, even if there's a small previsualization window of the associated material, in the first row, on the left, which displays the default 'light grey' of Blender.
The 1 Mat : 1 button states that the object has 1 defined material (the first number) and that the material number 1 (the second number) is defined as the active material. On our way through this tutorial, we will add many materials to the same object, and we will see the number on the left increase and show the corresponding number of materials available for the object. The number on the right (the active material) can be changed by clicking on the left side of the button (in order to diminish its index by one) or on the right side (in order to increase its index by one), thus defining the active material. Important note : the material index is limited to 16 for a given object. This means that you can't assign more than 16 different materials to the same object ! But everything is cool : 16 is well enough for us poor guys.The next button needs you to select the faces of the object you want to assign materials at. To do this, please select your object (right mouse buttons), enter the edit mode (TAB) and select the vertices belonging to the same set or family, according to your will (B-KEY one time in order to get a boxed selection, B-KEY two times to get a circular selection). In fact, what is selected and memorized by Blender are the faces connecting these vertices.The New button creates a new material (the previous button thus become something like 3 Mat: 3). Call immediately the Material Buttons (F5-KEY) to rename the material and give it a different color (and perhaps other material properties).
The Delete button erase the index of the active material. The material still exists and be reused elsewhere, either with another object or with another material index for the same object : the same material can be reused as many times as needed in the material indices of the same object.
The Assign button assigns the material corresponding to the active index to the faces connecting the selected vertices.As we said before, material indices also prove useful in the modelling of complex meshes. Try to think that you are modelling a human head ; you certainly would like to be able to gather the vertices shaping the ears, the lips or the nose into coherent sets. If you gave different material indices to these different parts of the head, then things will be easy ! Enter the edit mode (TAB) and make use of the two following buttons :
The Select button adds to the active selection the vertices belonging to the faces assigned to the active material index. For example, if you created a material index named 'Nose' and assigned the vertices belonging to the nose to this material index, then you can recall anytime the selection simply by clicking on this button !As a final word, the ? button returns the material index belonging to a selected face or vertex.The Deselect enables the opposite. Suppose that you have selected all the vertices of the face, and you want to duplicate them all except those belonging to the ears. You just have to select all the vertices of the human face (A-KEY), to activate the proper material index, and to click on Deselect !
|
|